Tuesday, 18 November 2014

Friends

Hi there,
The card l have chosen for today is a friendship one, thought l needed a change from all the Christmas projects.
The main card is a A5 landscape white base card and the main background is a piece of paper that l found within my stash, and is a lovely shade of blue. I then wrapped two different widths and shades of blue ribbon around the lower half of the card. The flowers l made using different shades of blue again and used the freebie dies from off the recent Tattered Lace magazine, and l chose to make the carnation ones, quite real to life don't you think? finished off this card using one of the Tonic sentiment toppers, which l inked the edges for definition.
I do hope you have enjoyed visiting my blog and feel free to leave your comments, Thank You.

Sunday, 16 November 2014

Christmas Rose

Good Morning.......
My post for today is this card l made using my Tattered Lace freebie that came with the magazine.
For the card l chose to use a 6 x 6 white card and used some silver mirror card for the main matt. I then layered a piece of pale blue paper that had a snowy effect on it. The dies l cut from some pearlescent card and l then coloured a small amount, the berries, and the centre of the roses, which l had by the way cut two extra ones out. I added three red gems within the corner holly, and finished off by cutting out the Christmas sentiment and adding this.
Thank you for visiting my blog please leave me your comments.

Friday, 14 November 2014

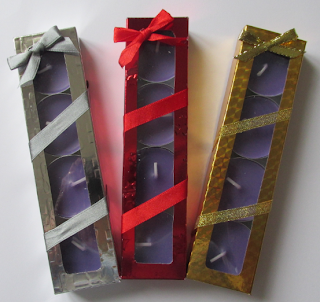
Boxed Candles

Hi there,
my post for today is another idea for stocking fillers....
The template was sent to me by my buddy, Sheila, and it is very simple to make and just holds 4 tea light candles. I made the boxes using mirror card to give a real christmasy feel. I thought then that they needed a little extra so l wrapped some narrow toning ribbon around and then added the bow on  top. These will be another item for my stock at my craft stall in December.
Thank you for stopping by and l do hope you will leave your comments.

Wednesday, 12 November 2014

Lge White and Red Wreath

Hi everyone,
Here's my post for today......
This wreath is a large one and l chose to make it more white than red, just for a change.
The Poinsettias were cut using my Spellbinders die and l used white pearlescent card, and glittered the edges of the petals. Used my glue gun for the centres and sprinkled tiny beads on whilst warm.
I then made the box to put it in, as seen below.
Thank you for stopping by and l do hope you have enjoyed visiting my blog, comments are welcome.

Saturday, 8 November 2014

Floral Canvas

Hi folks,
For todays post l have chosen one of my projects that l made a short while ago, l do hope l haven't duplicated it from previous posts.....
The canvas itself is 6 x 6 in size, and l inked and stamped it with distressed inks, and then also inked the edges to give definition. The flowers were made by using a Sue Wilson stamp, one of my favourites, and l chose three different papers, added some pearls sprays behind to finish the arrangement. I stamped the sentiment in the same colour and used one of my many dies to cut out the shape, attached to top right hand corner and added the two butterflies to complete it, also the ribbon for it to be hung if required.
Hope you have enjoyed visiting my blog and l look forward to reading your comments...Thank You.

Thursday, 6 November 2014

Owl inTree

Hi,
Here's my post for today.......
For this one l put a different slant on one of the designs from a Hunkydory kit...they are originally meant to be a free standing tree, but l found that they were top heavy and kept falling over so l decided to made an actual card. The base card is a A5 portrait card and l used a light beige in colour to pick out the lighter shade of the tree. I then wrapped a piece of acetate over the front and attached one of the trees, and then cut out the oval for the owl to show through. I then attached the other part of the tree within onto the actual card itself, and also the owl decoupage so when closed it looks as if you can see the owl "sitting" inside. Finished off attaching the text tag.
Thank you for stopping by my blog and l look forward to reading your comments.

Sunday, 2 November 2014

Desk Calendar

Here's my post for today,
This was included within a kit l recently bought from Hunkydory, and as usual this kit was beautifully foiled and die cut, and was very easy to make. this calendar is not dated, so would look lovely on any one's desk. There are tags within a pocket on the back, one for each month, and the smaller pocket on the front for the current month. Boxes are numbered to be able to turn appropriately for each day.
Hope you like this, and please feel free to leave your comments.....thank you.