Thursday 30 April 2015

Lou's 50th

Good morning everyone....
Here's my post l have chosen for today,
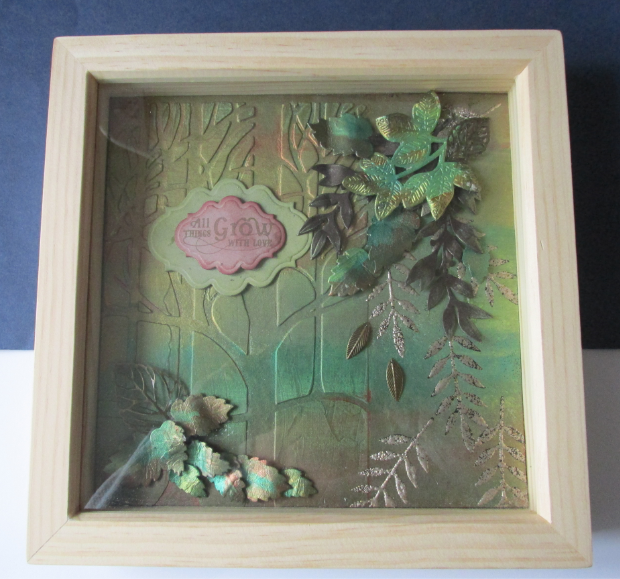
I made this for one of my friends, for her 50th birthday.
Started with an A5 landscape card and the base matt was a pale teal in colour, the next layer was a little darker in colour. In between the two l placed some borders that l cut from the new dies that was on the latest Tattered Lace magazine. The large circle is one of the Die-sire range. I stamped the text and embossed with Azure mist Wow embossing powder. Flowers were stamped using the Heartfelt stamps also embossed with the same powder, and added of course some gems in the centres. The 50 l cut using my Cricut machine in the same toning colours.
Thank you for visiting my blog please leave me your comments l love reading what you have to say.

Tuesday 28 April 2015

Floral Pop-ups

Hi,
Hope everyone is o.k. can't believe its almost the end of April, where do the days go?
Right, sorry but l am back to my "normal" crafting, these are two more of my pop-up boxes that l have made for my stall. I just realized that l hadn't made any with flowers on, well not recently anyway, so these are two that l made the other day....not a lot to say as l think you all know how to make these by now.
Many thanks for stopping by please feel free to leave any comments.

Sunday 26 April 2015

Lady canvas

Hello....
My chosen subject for my blog today is a canvas that l made recently.....
can't take the praise for the idea, as l made it at a workshop recently, and is the first canvas project l've made. For the base a stencil was used and some texture paste, then once dried was sprayed with shimmer inks, with water sprayed onto while wet and the colours then blended lovely. The ladies face was stamped out twice, once for the main then the second was used as a mask for when we sprayed again later. Swirls, Cogs, and flowers were then added, the flowers to imitate the ladies hair. Large butterfly placed in top left corner and the rest as shown....Really enjoyed making this project and intend to have another go soon.
Hope you have enjoyed viewing this and look forward to reading your comments....Thank You.

Friday 24 April 2015

Dressmaker

Hi everyone,
here's my post for today........
This was one of my samples sent to Hunkydory for their design team call.
The main card is an A5 portrait card and to start with l cut an aperture out, then embossed some pearl paper and attached to the front. Then placed the die cut circles one over the aperture and the other off set, also adding the small tag. On the inside l used more of the die cuts within the kit, placing central in the place of the aperture. Added a few buttons with thread through them and also some gems of course, we all love gems don't we....
Thank you for visiting my blog please leave me your comments.

Wednesday 22 April 2015

All about Vienna

Hi,
Hey don't be shocked......... here's a card l recently made for a customer as a special order....
The info l was given was that it was for her son and as he was going to Vienna for his birthday she asked if l could work on this as a theme, so this is was l finished for her.  As he was going to visit the theatre where all the major concerts were held...Musikvervein.....l sourced this, also requested a grand piano and music, so these were the toppers l made with this in mind. I made the main backing paper by going to my Serif and using the stamp mode l stamped the music, then ran it through my music embossing folder and used pearl guilding wax. Finished off by adding the three black candy......
Customer was delighted with the finished card, so my job was complete....
Thanks for stopping by hope you have enjoyed your visit...look forward to your comments.


Monday 20 April 2015

Jewellery or desk tidy

Hi here's my chosen post for today......
This is one of the ones that submitted to Hunkdory on my application to be on their design team, of which l was successful, maybe l have already told you this sorry if l have but l am so excited on being on their team.
Firstly l made the three drawers, which are like making match boxes really so you all probably know how to make them. I then chose some of Hunkydory foiled card and cut out the shape with one of my dies. I then used one of their toppers on each side and added flowers to embellish. Thought the top needed a little something so l made a tiny easel card with a greeting on...needless to say l was rather pleased with this.
Thanks for stopping by and please feel free to leave your comments. 

Saturday 18 April 2015

Lovely Kitty

Hi, my post for today is this card that l have chosen....
Started with an A5 white landscape card, and the topper and backing paper is from one of Card Creations C.D.'s Main background it matted onto black card and l then wrapped the ribbon around before attaching onto the base card, also threading a die cut buckle on first. The main topper is made by cutting several strips and layering as much or as less as you choose. I always leave space on my cards for my stall as then the chosen greeting can be placed on as and when needed.
I do hope you have enjoyed visiting my blog and l look forward to reading your comments....
Thank You

Thursday 16 April 2015

Picture Box

Hi there everyone.....
My post for today is a box, thought it would be a change.....
This was a project l made when l attended a workshop recently, these of which l love to attend, meeting new people and of course new techniques.....
The box itself is a 8 x 8, 2 and half inches deep, and was made from ivory pearlescent card, for the inset, that was a false insert made to set inside the lid, that was of course made with the acetate window. To made the design, this was made before attaching it to the inside of the lid.
First a texture paper was laid for the base, then the heart, swirls and flowers and birds were die cut, also from some pearlescent card/paper. They were then attached as seen, this completed this beautiful box, we were all so pleased with our finished project....hope to make more in different styles.
Thank you for visiting my blog, look forward to reading your comments.

Tuesday 14 April 2015

Butterfly Garden

Here's my post for today,
l chose this card that is one of the samples l submitted to Hunkydory for becoming one of their members of their design team, and guess what l was successful, so l am really looking forward to starting.
This is a 6 x 6 white base card and l decided to make an extra piece namely the acetate front.
The main design l placed onto the whole of the first front of the card and then wrapped the acetate around. I cut out the fence and gate and placed so that it was directly over the centre of the design.
Then of course we love to have butterflies so two were placed onto the front.
Thanks for stopping by and please feel free to leave your comments....

Sunday 12 April 2015

Black and White frame

My post for this morning is one of the designs l made for My craft creations and was made solely from digi-stamps.
I really enjoyed making this card and l think it is very effective with just being black and white.
Quite simple really matt and layered with the black and the cake was decorated with assorted gems.
A card for any occasion......
Hope you enjoyed stopping by my blog, and l look forward to reading your comments.

Friday 10 April 2015

Oldies

Hi, here's my post for today.......
This card was once again quick and easy to make, and was made solely using one of Hunkydory's kits, and started by using an A5 portrait card, attaching the background first, then placing the toppers and ribbon band. I popped out the picture and placed it flat then the frame was placed onto 3d foam pads to raise a little, the foiling makes this card, so nothing else was needed really. Finished off using a couple of the small topper/tag, lovely card for either anniversary or retirement.
Thanks for stopping by my blog and l look forward to reading your comments. 

Wednesday 8 April 2015

Flowers of Tomorrow

This is the card l have chosen for my post for today.....
This was the finished card that was made when l attended a workshop recently, l l was very pleased with the finished project, and hope you like it too.
The main card is white A5 portrait card and the main matt is dark blue. All the colouring is made using Faded Jeans distressed ink, so everything started off white. The background corner flourishes were stamped and embossed with white detail powder first then in came the tinting from the top right hand corner and the bottom left corner, then a little around the remaining edges. The flower petals were coloured with the same ink using small cotton buds, this is optional. The narrow lace was then wrapped around before the main was attached to the card. The die cut flourishes were then placed in the bottom right corner also the flowers, once again inked with the Faded Jeans. Small message was then stamped.
I do hope you like what l made and l look forward to reading your comments......Thank You.

Monday 6 April 2015

By the Seaside

Good morning,
here's my post for today.........
The toppers etc. for this card  was from a Hunkydory kit and l chose to made a Steeper card, cutting the background card, shaped around the waves to make the sea look-alike, and similar paper for the back stepper. Then it was so easy to place the various toppers in appropriate places to make the 'scene'. A nice, bright and cheerful card don't you think.
Thanks for stopping by and please leave your comments. 

Saturday 4 April 2015

Iris & Derek's Golden Wedding

This card was the card l made for my friends golden wedding anniversary.......
The base card is a 8 x 8 ivory card and the matts were of gold mirror card of course....
The main top layer was from the same ivory card and l used Tonic corner dies and also the heart for the centre. The letters and the numbers were also made from my dies, so really this was quite simply made but oh so effective, even though l pinched the idea from my another friend.
Thanks again for stopping by and l look forward to reading your comments.

Thursday 2 April 2015

Box Frame

Here's my post for today....
I recently attended a workshop at Sunrise Crafts with a few of my friends, and this was the finished item that we made.
This contained many techniques, including using texture paste, masks, inks, die cutting, etc.
The main background was made using a mask and texture paste and when dried was coloured using various inks. The leaves on the right hand side was made using a stamp and embossing powder with rough granules within it. The rest l think is self-explanatory as the die cut leaves were placed where-ever required. Finished off with the text tag, and then placed inside the box frame. I am a little undecided whether to leave the frame as it is or colour to tone in with the design.
I do hope you have enjoyed visiting my blog, look forward to your comments, Thank You.