Friday 23 October 2015

Wrapped Chocolate

Hi,
Something different for todays post....
I made these last Christmas for my stall and they were very popular, so l have made more for this year, an ideal stocking filler.
Very quick and easy, so not much l can say really, wrapped a quality bar of chocolate in Christmas paper, tied with some decorative cord and then topped with the poinsettia's, added a tag, job done.
Thank you for stopping by my blog and l look forward to reading your comments.

Wednesday 21 October 2015

Shamrock's

Hi there, here's my post for today......
These are two samples l made for Tattered Lace as l am now a member of their design team, this die is very intricate and for the first one l die cut out of black card, then placed some double sided sticky paper on the under side and added the green glitter, then matt and layered onto green mirror card and also black and white.....for the second one l did in the reverse really, using white for the main topper and die cut out of black , used a complimentary green for the main layer and black to give some lift.
I do hope you have enjoyed stopping by my blog and l look forward to reading your comments....Thank You.

Wednesday 14 October 2015

Poppies

My post for today.....
This is the poppy stamp and die used in a different way and kept to the traditional colour of red, rather fitting as Remembrance day is very near now....coloured and made very similar to the previous one but with different dies and the card is an A5 portrait one. I was very pleased with this one too, but then am always happy with the projects made at the workshops. Look forward to reading your comments, thank you.

Monday 12 October 2015

Yellow Poppies

Here's my post for today......
This card is yet another one made at the workshop with Bhanu at Sunrise Crafts, she is amazing with the designs she comes up with. this is a 6 x 6 white scalloped card and the main matt was coloured on the edges with distressed ink, the next matt was using Centure pearl and the edges were perforated with a ruler on all four sides. The stamp and die l believe was Heartfelt Creations, and coloured once more with inks, this was then layered onto the framework and a bow made from some twine was attached on the lower corner.  Many thanks for visiting my blog, feel free to leave your comments.

Saturday 10 October 2015

Winter Wishes

Hi there....this is my chosen card for todays post......
This is yet another card l made when going to my regular workshops at Sunrise Crafts. This is the first Christmas one that we have made, most of it is using distressed inks to make the background by blending the different shades with a circle placed to make the moon. For the trees and Santa we used dies, also the Winter Wishes that was a freebie on one of Tattered Lace mags. Finished off using some snow, and glitter of course.  thanks for stopping by and please leave your comments.

Thursday 8 October 2015

Dragonfly

Good Morning......here's my post for today
I chose to make this card quite simple as the image says it all, the image is a digi-stamp from Toni Arthurs, she makes such lovely digi-stamps and are very reasonable, take a look....to keep the simplicity l chose to use just black and white, and the image was coloured using different greys and l placed pearly doodles within the flowers. As l printed two images l decoupaged the dragonfly to give more depth. I do hope you have enjoyed stopping by blog and look forward to reading your comments, Thank you. 

Sunday 27 September 2015

Hi there folks.....
Here's my post for today, hope you like it.......
This was yet another card made when attending the Sunrise Crafts workshop, going on a regular basis nowadays as it is such a lovely day out and takes all the stress out of putting things together to make a card, think we all suffer from crafters block......lol......
This is a landscape card with the fold on the left side, quite a change l think...main matt was made using some lovely lilac card, then the background was made using a lovely pale grey, which was made with a perforated outline, famously called the Sue Wilson trick....flowers and leaves etc where made from more of the Heartfelt range, and coloured using Dusty Concorde, and had pearls added to the centres. This was finished off with some lovely herring bone patterned ribbon, and similar coloured thread for the bow.
Many thanks for stopping by my blog, please leave me your comments.

Friday 25 September 2015

Poppies

Hi, here's something a little different today...
As it is coming up to remembrance day l thought l would make some poppies to sell on my craft stall, as my nominated charity this year is The British Legion.
Pretty straight forward really, l used stamp of Heartfelt Creations, coloured them, shaped and glued them together, added some tiny beads in the centres, glazed them and attached to brooch pin.
I made a few last month and they sold out, so this is a top up for my next date.
Thank you for stopping by and l look forward to reading your comments.

Wednesday 23 September 2015

Flowers and Butterfly

Here's my post for today.......
This was made from an easel kit that my friend sent me, think it is very different and could be used for any occasion....The main image is a digi-stamp from Toni Arthurs.....found her on Face Book...
she has some love images and all her own work...l printed it out a couple of times, coloured both with my Chameleon pens and then made the decoupage....l had many comments on FB for this, really pleased with it and will be buying more from her.
Look forward to your comments...thank you.

Monday 21 September 2015

Single Flower

Hi, here's my post for today.....
This was a card l recently made at the Sunrise Crafts workshop, we make such beautiful cards, and Bhanu is such an inspiration.
This is a 6 x 6 scalloped edged white card and the first matt is made from black card, the next layer made from white but inked on the edges with Vintage Photo distressed ink. The background is from a paper pack by Heartfelt Creations l believe, this was also distressed using the same ink. A strip of hessian was placed down the centre, this was topped with the lovely flower, leaves and swirls. Three black pearls finished this card off.
Many thanks for stopping by and look forward to reading your comments.

Sunday 13 September 2015

Sunflower Book


Here's a different post for today.....
This was requested by my twin grand-daughters, for a friend of theirs that is going to do a little travelling, thus the cover was decorated with Central America, Brazil etc. The book itself was folded with the sunflower image of which l coloured to bring out the design. I enjoyed this as it is quite different l think and hope you do too.
Thank you, any comments would be really welcome.

Friday 11 September 2015

Second Mirror

Here's my post for today, a complete change.....
This project was made recently when attending a workshop at Sunrise Crafts, l really enjoy working on these, this is my second one....planning to give it to one of my twin grand-daughters, so that means of course l have to work on another. This was basically made like the other one just different embellishments and gilding wax colours.
Thanks for stopping by and please leave any comments.

Wednesday 9 September 2015

Flowers and Butterfly

Hi,
Here's my post for today.....
The main image is a digi-stamp that l purchased from Toni Arthur, she has some amazing digi-stamps that are her own drawings. For this particular project l printed two off and coloured, and then decoupaged, this was then attached to the easel. A nice quick gift idea.
I do hope you have enjoyed stopping by and l look forward to reading your comments, Thank You.

Monday 7 September 2015

Cool Babe/Cute Chick


Hi,
These are a couple of cards l made up from a selection of Hobby House toppers, these where already coloured so nice quick cards.
with just a few different papers etc., and embellishments they made up to cards for any occasion, this l do very often, for my stall that l have at my local hospital each month, for which l to raise funds for my local charities.
Thanks for visiting my blog, look forward to reading your comments.


Saturday 5 September 2015

Butterfly Fairy

Good Morning,
For a complete change, l have chosen this card l made the other week,
It is a 8 x 8 plain white scalloped edge card, and the first matt was silver, though it does look like gold in the photo. The next layer l ran through an embossing folder and lightly inked over to bring out the design. The main image is from the Flights of Fantasy C.D. and l coloured, using my Chameleon pens, l then die-cut it out using one of my many dies. Before attaching l wrapped purple ribbon round, and placed a bow. Finished off with some flowers and Just for You tag.
I look forward to reading your comments, and thank you for stopping by my blog.

Thursday 3 September 2015

1st. Wedding Anniversary


Hi
 Sorry to not have been keeping updated with my blog but have had Mum poorly for quite a few weeks, and now is in a nursing home, by her request may l say......
Anyway, here's my post for today....................
This was commissioned by my Grandson for his friends first wedding anniversary, quire appropriate really as the first is paper....
The book-folding is as seen in the photo, Mrs & Mrs, and l decorated the outer book by matting and layering, some embossing and distressing, as he wanted it vintage style, as was their wedding. Finished off by die-cutting letters for their names, twice so as to make the shadow effect.
Thank You for stopping by my blog, hopefully things will get back to normal now. Please leave your comments, would love to see what you think.


Sunday 16 August 2015

Workshop Aug 8th 15

Here's my post for today, yes sorry it is yet another that l made at my workshop, by the way it is at "Sunrise Crafts", really enjoy the day out each time....
The main card is made from both hints of silver and hints of gold Centura card, the different shades go so lovely with each other. The die used for this is the Spellbinders Labels 47, and so easy to use so differently. The centre piece is curved and just glued on the side edges, this giving a bowed effect.
The flowers were made also from using a die and inked with distressed ink and shaped into the finished effect and also leaves to compliment. Finished off by adding the pearls to the centres of the flowers, and the ribbon down the left side, which was tied into a knot rather than a bow.
I do hope you have enjoyed looking at my posts, look forward to reading your comments...thank You

Thursday 13 August 2015

Workshop card 8.8.15

Hi, Here goes my post for today....
This was one of the projects at my recent visit to my workshop....
The background was made by placing colour blocks on the base card, and when dry ran through an embossing folder, then used small amount of gilding waxes to highlight the design. This was then layered onto some black card and then onto the base 8 x 8 square card. The black topper was cut using a die and placed central. For the topper starting with a piece of thick card 4inches by 4inches.
Then texture paste was spread onto it and also some patches of blue paste, this was then heated with my heat tool until it started to bubble, whilst still heating it l used my other hand to prepare my stamp....inking it ready to place straight into the hot paste....left it in place until it had cooled down and then lifted it off. I was very pleased with the finished result, quite different from the norm..
Thank you for stopping by, please leave me your comments...

Tuesday 11 August 2015

Hedgehogs

Hi,
Sorry l haven't kept up to speed with my posting, but having a hectic time at mo as Mum's been in hospital for a while now and time seems to run out quickly....anyway here's my post for today.....
These are one of my projects that l have made recently, l am really into book folding at the moment, l find it so relaxing, though time consuming.
Hope you have enjoyed visiting my blog, look forward to reading you comments...Thank You.

Sunday 26 July 2015

Zentangle Roses

This my card l have chosen today,
l made this a while ago and is an A5 landscape white card for the main card, l then used black for the matting and layering. The roses are stencils and l outlined and then zentangled, using the colour for the centre one. I embossed the main background layer using my ever favourite dotty folder. Finished off this card with the coloured card candy.
Hope you have enjoyed visiting my blog, look forward to reading your comments. Thank You

Friday 24 July 2015

Workshop card

Hi there, here's my post for today.....
This card was made on my recent visit to Sunrise Crafts workshop...Bhanu is a very special lady, she preps for these expertly, everything is cut and organised for us. We then colour using distressed inks, and place under her instruction. Not sure which dies she has used, they usually are Heartfelt Creations.  I was really pleased with this on, as l love the colours we used.
Thanks for stopping by and please leave your comments.

Wednesday 22 July 2015

Baptism Card

Here's the post l have chosen for today....
This was a special order, for a Baptism card, l started with a white A5 portrait card, l then cut out using my die, the base matt out of Centura white pearl card. The main image is a stamp of Lily of the Valley, and l just coloured the window, and the babies face and hands. This was then cut out using one of my oval dies. For the background for this to placed on l chose yet another of my dies and attached on the back double sided sticky sheet, then used pale pink glitter into the cut area, this was then placed in the centre. Using dies again l cut out the words twice, once in the Centura white and secondly in silver, placed so as to give a shadow effect.
I do hope you have enjoyed my post today , look forward to reading your comments.

Monday 20 July 2015

Making Cards sample


For todays post l have chosen this card,
I made this card as a sample for Making Cards magazine, as l was requested to do so for a publication for the October edition. I was very proud and surprised to be asked to do this.
Most of the card is white, l have recently really enjoyed white on white. The centre piece was cut using Creative Expressions die, Ornate pierced rectangles, and these were placed onto double sided sticky sheet and then fine glitter was added. I then placed the length of lace down the left side and topped with stringed pearls. The flowers were cut using Heartfelt Creations Sun Kissed Fleur stamp and die. I lightly inked them with Spun Sugar distressed ink. Also added were Ivy from DieSire, and Creative Expressions Dandelion clocks.
Thanks for visiting my blog, l do hope you have enjoyed...please leave your comments.

Saturday 18 July 2015

Birdcage in Aperture

My post for today is a card l made at a workshop at Sunrise Crafts.....
This is yet another of the beautiful projects that Bhanu designed for us to make...
She usually cuts everything out for us then goes through it step by step, they are very enjoyable and you come away with a beautiful card everytime.
I think that this one is self-explanatory. as there is an aperture in the centre, where the die-cut birdcage can be seen. The flowers were also made by using dies, and coloured to your own choice.
I do hope you have enjoyed visiting my blog, please leave your comments...Thank You. 

Thursday 16 July 2015

Janettes Birthday

Here's my post l have chosen for today....
This was yet another birthday card for one of my friends.....
This was made by using a shaped card from my stash, l believe is was purchased from My Craft Studio, many moons ago, l had actually forgotten that l had them. They as you can see have the shape of a book. I covered the main card with a pale pink, and used different pieces from yet another kit that l had forgot that l had. Finished off by attaching the tag onto the front topped by the bow and tag.
Hope you have enjoyed visiting my blog, please leave me your comments...Thank You.

Tuesday 14 July 2015

Clare's birthday

Hi, sorry its ben a while since l last posted, have had loads of things going off....
This is my post for today....
This was made for my friends birthday, and the card itself is an A5 landscape card, l started off by embossing the main background with the small dotty folder, using a dusky pink card and inked the edges using Shaded Lilac distressed ink. I found the photo of one of her much loved dogs and used it for the main feature. Using one of my dies l made the frame from some lilac card, then added the swirls and made flowers using the same colours.
Thanks for stopping by my blog and l look forward to reading your comments. 

Sunday 5 July 2015

Zebra

My post for today is this card that l made recently when attending a workshop....
The Zebra itself is a stencil, and is quite easy to get this effect, just by using the Black Soot distressed ink pad, and the green which l think was bundled sage. The green dotty effect was made by using some sequin waste and inking through it. These were then matted and layered to give the finished effect. Completed this by tying some green twine down the spine and tied into a knot.
Thanks for stopping by my blog, please leave me your comments.

Friday 3 July 2015

Steve's birthday

Here's the post l have chosen today, the card l made for my son's birthday.
As he was going to Goodwood for a few days for the racing l thought that is would be appropriate to make one with that theme. I sourced the photo's of his favourite drive...Lewis Hamilton, and printed off onto photo paper, placed these onto the black and red layers. finished off with the track layout and the Goodwood logo.
Hope you have enjoyed visiting my blog, look forward to reading your comments...Thank You.

Wednesday 1 July 2015

Mini-frames

Hi, here's my post for today....
These small frames were bought from a craft shop and were very cheap.....
They were first painted using the IndigoBlu metallic paints, l then cut and made the flowers, and leaves and attached on the corners. For presentation purposes l placed a sentiment inside, but of course photo's can also can be used.
Thanks for stopping by my blog and l look forward to reading your comments....

Monday 22 June 2015

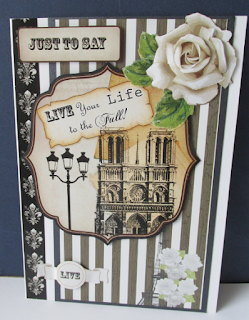
Live your Life

Hi, This is today's post.....
Now for this one l used a kit that had been floating around my craft room, so decided to make this card with it, sorry can't remember where the kit was from. The card itself is a white portrait card and l used the striped background and then placed the layered main topper pretty central. Placed the darker border down the spine and then attached the flowers around, and finished off with the "just to say" tag.
Thanks for stopping by, and please leave your comments...

Friday 19 June 2015

Yellow Floral

Here's my post for today......
This card was made when l attended a workshop last month....here's hoping l haven't already posted this, fingers crossed, my heads everywhere at moment....
This is a landscape card and mainly white with the lovely pale yellow flowers. Most of the contents are made from Heartfelt creations products. A length of lovely lace was positioned down the spine, also a string of lovely beads. The centres of the flowers were made by using glue gun and tiny seed beads.
Thanks for visiting my blog, look forward to reading your comments.

Tuesday 16 June 2015

Christening Book


Hi, Here's my post for today......
The was a commission for a Christening last week, and for baby called Rhys....
As l am now very addicted to the new craft of book-folding l was asked if l could make this, and as l have now purchased the alphabet this was possible....
After the main book-folding l decorated the front with some lovely blue Adorable Scorable card and embossed with the dotty folder. Then l stamped and embossed the sentiment and cut and layered and placed on the front.  Attached the blue ribbon and also the tiny teddy on the front.
I do hope you have enjoyed viewing this, please leave me your comments...Thank You.

Sunday 14 June 2015

Money Wallet

Hi there everyone....
sorry its been a while, Mum's in hospital so just grabbing a chance now to post....
This was an order for my friends grand-daughters 18th birthday and she wanted something to give her some cash for her, so this is what l made for her....
The pink pattered card was l think from one of Hunkydory's kits and l scored and folded it to make the wallet itself, place an 18 inside and the front was decorated with the two Tattered Lace shoes, that was cut from some bright pink mirror card....now complete.
Thank you for visiting my blog and please leave me your comments...

Wednesday 3 June 2015

Tiger

Hi there, here's something a little different....
Yet another project l made at my regular workshop.....using Sweet Poppy stencils....
Fastened the stencil securely and then inked over using Vintage Photo, distressed ink, then this was then accented by using some sequin waste and using the same colour tinted around the edges. This was then matt and layered and then placed onto the top of the base background that had been embossed using the snakeskin embossing folder, and this was also tinted with the same colour. Finished off using some twine tied on the left hand side and the message tag also.
Hope you have enjoyed visiting my blog, look forward to your comments...Thank You.

Monday 1 June 2015

Book folding-Heart

Hi,
For todays post l have chosen one of my new range, book folding, before l started this project l coloured the edges of the pages with some red colour, and then upon folding it just shows the heart, which l think is quite impressive though l say it myself. Found some ribbon from my stash that has white hearts upon it and tied it around....added a few red rosebuds to add a little embellishment.
Thank you for stopping by my blog, look forward to reading your comments.

Saturday 30 May 2015

Tyler's 4th birthday

My post for today is the card l made for my great grandson's 4th birthday on Wednesday past.
The main card is a 8 x 8 scallop edged white card, that l inked with Faded Jeans distressed ink, the first matt l chose the red and the second the blue, which was embossed using the stone wall embossing folder. For the number four l found out of my stash WS designs templates and traced round using a pale blue and then embossed with the dotty embossing folder, matt this onto the red.
The Spiderman figures were "sourced" and then cut out and arranged around the number. He was thrilled to bits with it, so it was a success.
Thanks for visiting my blog, please feel free to leave your comments.

Thursday 28 May 2015

Special Day

Hi there, here's the card l have chosen for todays post.....
I made this card at my regular workshop visit, its amazing what Bhanu at Sunrise Crafts comes up with.
The main design is made using various dies, mainly Heartfelt creations.
This was made colourwise in white pearlescent and a lovely tone of silver grey, of course this could be made using any colour that you wish to choose. The flowers were made using a new die that uses the quilling technique.
Hope you have enjoyed visiting my blog, look forward to reading your comments.

Sunday 24 May 2015

Book of Tags


Hi everyone,
My post for today is one of the projects l made for the Hunkydory POD, as l am now one of the members of their design team.
As everything is included within the kit it is very easy. Though this is supposed to be a bag with notelets, l decided, with a little help from my mate, Sheila, to do a little different and come up with this book of tags. Made the main bag structure as the book outer and then made a spine of mountain and valley folds and attached the "cards" as pages. I then made some pockets and made tags and placed inside. Got a mention, by name, of which l was very pleased to hear.
Thanks for stopping by my blog and look forward to reading your comments.

Friday 22 May 2015

Beautiful Floral

Hello everyone,
Here's my post for today, for this one l chose to use inspiration from one of the many cards featured on Sunrise Crafts website, think we all need a little of inspiration at times.....
The card is white A5 landscape and the matts are silver in colour. The first matt was embossed and layered and the upper most layer was cut using yet another one of my new dies. Flowers were also stamped and embossed and cut using a die, then coloured using my Chameleon pens. Finished off by attaching the white satin bow, a card for any occasion l think.
Thank you for visiting my blog and l look forward to your comments.

Wednesday 20 May 2015

No:1 Dad


Hi, Now here's a little something different, l have recently started the new craze of book folding, although this is quite easy it is very time consuming. The pattern l used was from Debbi Moore's C.D. vol. 1. and as it is coming up to Father's Day soon l thought l would give this a try for my stall.
The Red heart and the Mum one sold last time so fingers crossed l will sell more this time too, so more for my local charities. These are available to order if anyone is interested.
Looking forward to reading what you have to say about this post and Thank You.

Monday 18 May 2015

May all your Dreams

Hi, there sorry this post is a little late but have been rather busy, have now been chosen as part of the Hunkydory design team....
For todays post l have chosen this card l made a few days ago as l bought the stamp and die recently so thought l had better use it.....
The card is A5, portrait and is white, l then chose some pearl for the main matt under the peach coloured card. I used one of Tonic's corner dies and cut leaving them within the card. The topper was used as l said from the new stamp and matching die. I used my Chameleon pens for the colouring.
Thank you for stopping by my blog and l look forward to reading your comments.

Thursday 14 May 2015

Birdhouse canvas

Hi there you lovely people.....
For today l have chosen this canvas that l made recently when l went to a workshop.
For the start of this l chose and cut different widths of paper and made a centre piece by weaving a shape of my choice and glued to the main canvas. Then gave this a thin coating of Gesso, when this was dry the next application was by using stencils and some crackle paint. Once again after drying applied the black by using another stencil. Then for the finishing of this the painted and decorated birdhouse was glued in position, with the swirls and flowers to decorate....l really enjoyed this project and intend to make some more very soon.
Hope you have enjoyed this post, look forward to reading your comments, they do make a difference, Thank You.

Tuesday 12 May 2015

My Room

Hi,
My post for today is a nice quick little project, l have made quite a few for my craft stall and are very popular.
The main hanger is made from MDF covered with my chosen backing paper, after painting with the chosen colour as a base. The image is one l chose from one of Docrafts Digi-designer C.D. Then finished off with the words, cut using my Cricut machine, in two colours to shadow them, then topped off with the large "bloomer" flower.
Hope you enjoy visiting my blog, please leave me your comments....Thank You.