Tuesday, 14 April 2015

Butterfly Garden

Here's my post for today,
l chose this card that is one of the samples l submitted to Hunkydory for becoming one of their members of their design team, and guess what l was successful, so l am really looking forward to starting.
This is a 6 x 6 white base card and l decided to make an extra piece namely the acetate front.
The main design l placed onto the whole of the first front of the card and then wrapped the acetate around. I cut out the fence and gate and placed so that it was directly over the centre of the design.
Then of course we love to have butterflies so two were placed onto the front.
Thanks for stopping by and please feel free to leave your comments....

Sunday, 12 April 2015

Black and White frame

My post for this morning is one of the designs l made for My craft creations and was made solely from digi-stamps.
I really enjoyed making this card and l think it is very effective with just being black and white.
Quite simple really matt and layered with the black and the cake was decorated with assorted gems.
A card for any occasion......
Hope you enjoyed stopping by my blog, and l look forward to reading your comments.

Friday, 10 April 2015

Oldies

Hi, here's my post for today.......
This card was once again quick and easy to make, and was made solely using one of Hunkydory's kits, and started by using an A5 portrait card, attaching the background first, then placing the toppers and ribbon band. I popped out the picture and placed it flat then the frame was placed onto 3d foam pads to raise a little, the foiling makes this card, so nothing else was needed really. Finished off using a couple of the small topper/tag, lovely card for either anniversary or retirement.
Thanks for stopping by my blog and l look forward to reading your comments. 

Wednesday, 8 April 2015

Flowers of Tomorrow

This is the card l have chosen for my post for today.....
This was the finished card that was made when l attended a workshop recently, l l was very pleased with the finished project, and hope you like it too.
The main card is white A5 portrait card and the main matt is dark blue. All the colouring is made using Faded Jeans distressed ink, so everything started off white. The background corner flourishes were stamped and embossed with white detail powder first then in came the tinting from the top right hand corner and the bottom left corner, then a little around the remaining edges. The flower petals were coloured with the same ink using small cotton buds, this is optional. The narrow lace was then wrapped around before the main was attached to the card. The die cut flourishes were then placed in the bottom right corner also the flowers, once again inked with the Faded Jeans. Small message was then stamped.
I do hope you like what l made and l look forward to reading your comments......Thank You.

Monday, 6 April 2015

By the Seaside

Good morning,
here's my post for today.........
The toppers etc. for this card  was from a Hunkydory kit and l chose to made a Steeper card, cutting the background card, shaped around the waves to make the sea look-alike, and similar paper for the back stepper. Then it was so easy to place the various toppers in appropriate places to make the 'scene'. A nice, bright and cheerful card don't you think.
Thanks for stopping by and please leave your comments. 

Saturday, 4 April 2015

Iris & Derek's Golden Wedding

This card was the card l made for my friends golden wedding anniversary.......
The base card is a 8 x 8 ivory card and the matts were of gold mirror card of course....
The main top layer was from the same ivory card and l used Tonic corner dies and also the heart for the centre. The letters and the numbers were also made from my dies, so really this was quite simply made but oh so effective, even though l pinched the idea from my another friend.
Thanks again for stopping by and l look forward to reading your comments.

Thursday, 2 April 2015

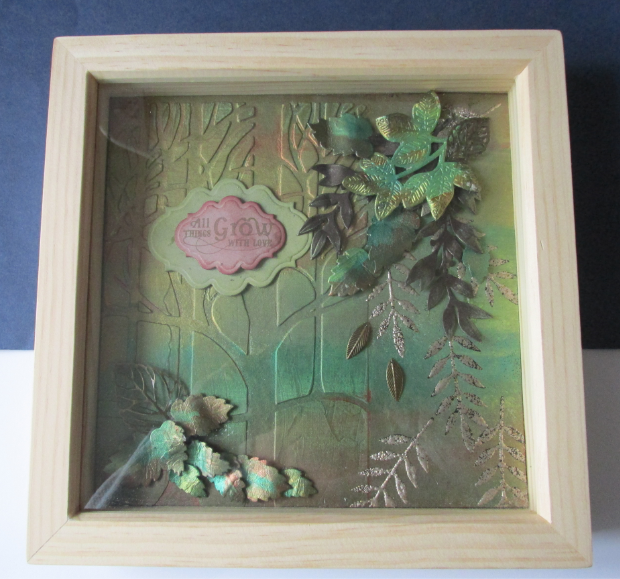
Box Frame

Here's my post for today....
I recently attended a workshop at Sunrise Crafts with a few of my friends, and this was the finished item that we made.
This contained many techniques, including using texture paste, masks, inks, die cutting, etc.
The main background was made using a mask and texture paste and when dried was coloured using various inks. The leaves on the right hand side was made using a stamp and embossing powder with rough granules within it. The rest l think is self-explanatory as the die cut leaves were placed where-ever required. Finished off with the text tag, and then placed inside the box frame. I am a little undecided whether to leave the frame as it is or colour to tone in with the design.
I do hope you have enjoyed visiting my blog, look forward to your comments, Thank You.