Saturday, 31 May 2014

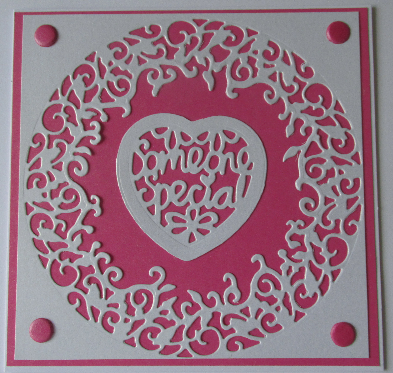
Someone Special


Hi there everyone, something a little different today.
This card is a 6 x 6 plain white base card, and the main background is some lovely coral pink card left over from an order that l recently made. I trimmed it so it left a narrow border on the base card, the l cut a slightly smaller piece of white Centura pearlescent card, l then, using my new Tonic dies cut the lovely lacey centre-piece, and also with my Tonic l cut the "someone special" heart and placed it central inside the aperture. Finished off this card with some matching card candy, this l think completing the card.
Thank you for visiting my blog, hope you have enjoyed what you have seen, please return.

Thursday, 29 May 2014

Soldiers 18th


Hello everyone, hope you are all busy with your crafting.
My post for today is an order for a soldiers 18th birthday, so l searched through my C.D.'s to find the
images that l have used, found them on one of My Craft Studio's, so printed off what l needed and started off with the camouflage background, matted and layered onto some dark green and beige card
for definition, then cut out the boots and hat, and also the main topper and matted them onto the same beige card. Then taking the same green and beige card l cut the 18 with my Cricut machine. I was quite pleased with the finished card and so was my customer that ordered it, hope the recipient did too.
Hope you have enjoyed visiting my blog please leave any comments you have, Thank You.

Tuesday, 27 May 2014

Little Claire project


Hi everyone,
My post for today is a project from Little Claire club.
These are quite quick little projects as they come complete with everything that you need to make,
either to follow their design or your own. This time l chose to follow theirs, as you can see very easy,
as l felt like making a quick one. The main image is from the set of stamps included, and coloured using my Spectrum Noirs, then matted and layered using the pieces of card supplied. The piece on the front was just a strip and folded into a valley and mountain fold and attached to the main design. Added the white card candy and job done, a nice little card for any occasion don't you think.
Many thanks for visiting my blog, please feel free to leave your comments.

Sunday, 25 May 2014

Wedding Day


Hello everyone,
Here's my post for today.......
Sorry but once again l have used another of Hunkydory kits, this time l have used a 6 x 6 white card, and trimmed down one of the backing papers to completely cover it, then using one of my Tonic layering dies l cut a toning piece of card and then layered the topper onto it. Looking in my stash for something to embellish it, l found the two faux wedding rings, attached these then added three oval gems in the top corner, nice and simple really but hopefully you think it quite effective.
Thank you for visiting my blog, any comments you have would be appreciated.

Saturday, 24 May 2014

White Baby box


Hi,
For a change l chose to post this box project,, l know l seem to be hooked by these boxes but they are so easy to make once you have made one, and there are so many themes you can make them in.
As l have probably said before l have a regular stall at my local hospital selling my cards etc, and these boxes have been very popular, l had made a pink and a blue one but as you well know you always get asked for what you haven't got, so being as l was asked for a white one here it it.
For the pop-ups l used once again my Cricut machine and the New Arrival cartridge that my friend Sheila has lent me, also cut the "shadow" out of a very pale green, just give a little definition.
And for the sides l used some of my many peel-offs, matted them onto card and coloured accordingly.
Hope you have liked what l have posted today, and any comments left would be welcome.

Thursday, 22 May 2014

Black and Red Wedding


Hi Everyone,
Now don't be shocked, this was a special order, and as the wedding was last Saturday l think it will be o.k. for me to show you all.
It was quite an unusual request, the black and red, but l think that it finished off being quite effective in the end.
For the background l used some black satin card and embossed with the Rose Vine folder and placed it onto a red card. Then surprise, surprise, l cut the heart, rose and love sentiment using my Cricut, this has now come out of "retirement" and l am using it more often. The lacey ribbon was cut using one of my many Tonic punches. Although you can't really see, l also cut shadows for them all in a matt black card. To finish off just to give it a little lift l wrapped a grograin ribbon across and added a bow. My customer that ordered it was over the moon, so that pleased me too.
Many thanks for stopping by, any comments would be greatly appreciated.

Tuesday, 20 May 2014

You're Engaged

Hi there everyone, my card for todays post is.....
This was made from one of the Many beautiful Hunkydory kits, and as l have been rather busy over the past few days l thought l would have a "play".
As these cards are quite simple, due to the gorgeous product this was made very quickly. The main card was a complete foiled A4 card and l scored it in half to make the base card. Then of course all there was to do was to place the toppers, on 3D foam pads....job done and a lovely completed Engagement card.
Thank you for visiting my blog and any comments would be welcome.