Friday, 31 October 2014

Wintery Lane

Hi,
My post for today.......
As you are probably just like my seem to have stash that we never seem to get to, but hey this is a card l have made from some of mine, this card is made from a lingering kit, made by using a 6 x 6 white card, main matt is some silver mirror, then some textured white card. I then placed two strips of silver glitter card and then place the topper over. Finished off using a tag, bow and a few snowflakes, nice quick and easy card,
Thanks for stopping by and l do hope you find the time to leave your comments.

Thursday, 30 October 2014

Hooded Jacket

These are knitted with best baby double knitting wool, and can be ordered in colour required.
Usually got stock of the main colours....white, pink, blue, and cream, and are priced at £8.99 each
Interested?.....contact me  kathleen.freeman2@talktalk.net 

Wednesday, 29 October 2014

Framed Decoupage

Hi there, here's my post of today.....
This was a nice change to make as l had found some Tonic die cut box frames, and also came across the decoupage picture in my stash, so this is the finished item.
I made up the frame and covered the edges with some Hunkydory adorable scorable after first embossing it with my dotty folder. The decoupage was then inserted into the centre of the box, and then finished off with some more flowers in the corners of the box.....below are two pictures showing that l made a box for the finished project, thus making it an ideal gift.
Hope you have enjoyed stopping by my blog and look forward to reading your comments...Thank You.

Monday, 27 October 2014

My New Chameleon pens

Hi folks,
this is just a quickie really, l have just bought the new Chameleon pens and thought l would show you my first pictures l have coloured using them. They are bril. and l love using them, l will of course be posting finished items on my blog once l have made them......Thank you.....

Saturday, 25 October 2014

Art Deco Desk Calendar

Hi there everyone,  here's my post for today......
This was made using a blank kit from Craftwork cards,
For the design l chose to use some Art Deco leftovers to decorate, and used different colours for each tag. Each tag is decorated with the paper for background and then a topper added and also each month is put on each tag separately. I then added two coloured pieces of ribbon through the top of the tag, these are then each month tucked into the pocket on the front of the main box.
I loved doing this and will be making more, and it doesn't need to be said l have made myself a template.
Many thanks for stopping by and please leave me your comments.

Thursday, 23 October 2014

Little Claire, Oct./14

Here's my post for today.....
This was the Little Claire's October project and is quite different, as it has the little pockets inside.
The main design was by using 4 x 4 envelopes, three in total and they were stuck together with their flaps. They were then decorated in the way shown, toppers were edged with some silver glitter glue.
Pictures below show the inside, as it folds into three, being tied then with the ribbon.
Hope you have enjoyed popping in to view my blog, please feel free to leave your comments....
Thank You.

Tuesday, 21 October 2014

Iris's Birthday

Hi there everyone,
here's my post for today.....
I made this card for my friends birthday, yesterday, as she loves her perfumes l thought it quite appropriate.
The base card is a A5 landscape white card and l used some pearl card for the background, the topper is l believe one of Hunkydory's and l used one of my dies to cut it out. I then chose the dark maroon pearl card and matted the topper onto it, l also cut out the embellishments using the same card.
Her name was cut out using my Cricut machine.
She was thrilled to bits with it when l took it to her yesterday.
Thank you for stopping by my blog and please leave me your comments.

Sunday, 19 October 2014

Twin girls

Good morning,
here's my post for today.......
As l was making the previous commissioned card and cot, l thought hey l haven't got within my stock any cards for twin girls, so this is what l ending up making plus many more in both girls and boys.....
For a change l chose this a 6 x 6 white card blank and found both of the pink card stock in my stash one is glitter the other is pearlescent.  I used half and half and punched a border on the edge of the glitter one. The topper was once again using the Lily of the Valley stamp, and coloured with my Chameleon pens. Finished off adding congratulations tag and adding the pink gems.
Thank you for stopping by my blog, look forward to reading your comments.

Friday, 17 October 2014

Celebrate Twins

Good morning....
My post for today is a cot for birth of twin boys, and was a special order...
As you can see the cot was made very similar to my usual ones, but l put their names on the head and foot boards, and also added another teddy of course.....Below is the card also commissioned by the same person, also personalised with their names. For the card l chose to make a A5 landscape and of course followed through with the same colours. The stamp l used is a Lily of the Valley stamp and was coloured using my NEW Chameleon pens (they are Great) l then used one of my Spellbinder dies for the silver matts. Wrapped ribbon around before adding the finished matt and added the bow with the Baby charm added to it. Finished off by adding the "Twins are twice as nice" text tag.
Thank you for stopping by to visit my blog and hope you will add your comments. 

Wednesday, 15 October 2014

Decorated Candles

Hi ....here's my post for today.....
Now this is a nice change from card making and l have enjoyed it very much
The candles l purchased from one of my local shops, and have a Vanilla fragrance...
Finding in my stash l had some lovely patterned serviettes, so these were what l used.
l trimmed out the part of the design that l wanted and then held tightly around the candle
holding in place with some baking paper. Then using my head gun l made contact with the
heat and moved over the design, smoothing out any creases as l went along. For some of
them l trimmed with some of my border peel-offs, then placed in a cello-bag and tied
tightly at the top and added some ribbon for trim. Using a punch l punched out either flower
or butterfly for embellishment. I also made some Christmas ones as pictured below.
I do hope you have enjoyed visiting my blog and l look forward to reading your comments...
Thank You.

Monday, 13 October 2014

Robins

Good morning there everyone, ....my post for today is one l made from one of Hunkydory kits.
I thought that this would be a nice change from the wreath posted on Saturday.
The base card is a 6 x 6 white square card and l completely covered it with some gold mirror, then used a piece of the background also included in the kit. Then l added the two toppers also matted onto the same gold mirror, by adding the small tag this card was completed.
Quick and simple but hope you agree effective.
Thank you for visiting my blog and please leave me your comments, much appreciated.

Saturday, 11 October 2014

Small boxed wreath

Hi there hope everyone is o.k.
its a very murky foggy morning here in Burton on Trent, but excellent weather for some crafting....
My post for today is a wreath that l made using a Spellbinders die, its a bit time consuming to do all the cutting but well worth it. The base circle was painted with some green acrylic paint and then the ribbon was attached. Then all the worth of gluing the flowers on. The centres were made using my glue gun and some glitter glue sticks. To give a little lift l made the three white Poinsettias.
Below is the completed wreath within the box that l made for it. I have already sold one of these, so hopefully my charity will benefit from the work put into them.
Hope you have enjoyed stopping by my blog and l look forward to reading your comments.
Thank You.

Thursday, 9 October 2014

Linda's birthday

Good morning everyone, here's my post for today.........
I made this for one of my friends that meet up for demonstration days at our local garden centre....
The base card was layered with a white background that had been embossed, then, using one of my new Tonic dies l made the header, so to speak, using both the same white and some pearl bronze colour, added the chosen centre piece, special friend,  l then added the three paper flowers in the left corner, and finished off with the bow with the pearl stud in the centre. As there is quite a bit of dimension l made a box in the same bronze pearl card.
I do hope you have enjoyed visiting my blog, look forward to your comments, thank you.

Tuesday, 7 October 2014

Seems like Yesterday

Hi everyone,
Hey, my post for today is not from a kit, hope you like it....
this is one of my samples that l made for a challenge blog mycraftcreations , do take a look and take part there's lovely prizes.
The main image is a digi-stamp, and l coloured it with my Spectrum Noir pencils, l am using them quite frequently nowadays. For the background l chose to use one of the Messy Rabbit backing papers l thought is quite appropriate at the little ones were looking through a book, this was all then layered onto a 6 x 6 white card, ideal for any occasion don't you think?
Thanks for stopping by and l will look forward to reading your comments.

Sunday, 5 October 2014

Diarama cards

Hi,
My post for today is yet another one from the Hunkydory kit, at moment just need simple things to make, my poor brain is a little tired from the preparation for my grand-daughters wedding, l will get back to my normal crafting soon l promise,
These were again quite simple to make and l think very effective once finished. They are very similar to decoupage really, just with the concertina folds on the sides to make them 3D. When finished they fold flat to go into the envelope and therefore keeping postage to a minimum.
Hope you have enjoyed visiting my blog, please feel free to leave your comments, Thank You.

Friday, 3 October 2014

Calendar

Hi there.....
Gosh another week over, where do the days go....
my post for today is a Hunkydory project that was included within one of their kits, as l have said before sometimes its nice to make something from a kit, gives the old brain a rest so to speak  haha.
This was quite easy to make and consists of a stand and the three boxes that once made up they rotate to be able to change the date. There is also a pocket to hold the spare months on the back, so is kept self-contained. Not a lot more to say really about this completed gift.
Thank you for visiting my blog and hope you will leave your comments.

Wednesday, 1 October 2014

Kingfisher

Hello everyone,
back to card-making now and this one l made for my friends blog challenge, please take a look and perhaps join inmycraftcreations
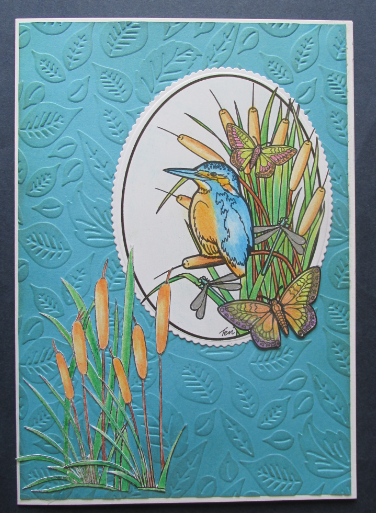
The main card is an A5 portrait white card and for the background l chose the pretty blue to tone with the Kingfisher, embossed it using the leaves folder. The main topper is a digi-stamp and l coloured it using my Spectrum pencils, really getting into using those now......then using one of my many dies l cut it out and placed it slightly off centre. I decided l wanted more bull-rushes, so searching through my stamps l found these that were from a set from Dimensions, stamped a few times and layered them in the bottom left corner....as always l have left the rest an open space to be able to personalise for any occasion.
Thank you for stopping by, please leave your comments.