Friday, 12 December 2014

Fridge magnet Calendar

Hello folks,
My post for today is one of many that l made for my stall, l made eight for Mondays stall and guest what....they all sold out, brilliant for my charity pot.
These are so easy to do and just need the main backing card and you can embellish with whatever you choose really, l find Art Deco goes well for me, its very popular, add the calendar on the lower edge and job done.... later next year l think l will make them by replacing the calendar with a notepad. I add the piece of magnet on the back, another way of using your small pieces of magnet, and l also add the ribbon on the top edge so this can be hung if required.
Thanks for stopping by my blog, please feel free to leave me your comments. 

Wednesday, 10 December 2014

Gift card wallets

Hi there,
 These are some gift card wallets that l made for my craft stall, ideal for either cash or store gift cards,
they are made to look just like a wallet and have sections within for the above use. Nice quick little project and so cheap to make. Below is another three that l made.
Hope you have enjoyed visiting my blog feel free to leave your comments. Thank You.

Monday, 8 December 2014

Oriental Urns

Hi there everyone,
Sorry but my posts will be less frequent over the Christmas period but will pick up in the New Year.
This card was made from a 6 x 6 white base card and l had a play with some of my Tattered Lace dies.
As you can see it is self explanatory  really, the centre piece was used by cutting into a fan die and the urns were as cut, but l layered them onto two shades of blue. The main background was a piece of darker blue and put through with a dotty embossing folder. Finished off with the white card candy, a card for any occasion really.
Thank you for stopping by and l look forward to reading your comments. 

Thursday, 4 December 2014

Christmas Lantern

Hello there,
Todays card is another of my samples for the challenge at My craft creations please take a look and have a go......the card is a A5 landscape white card and the first matt is gold mirror card, the next layer is white card which l embossed using the music folder. In my stash l found the strip of gold glitter card and after wrapping some Christmas ribbon around it l placed it across the lower half of the card. The topper is a digi-stamp, l printed it off twice and after colouring with my Chameleon pens l used the second print for a layer of decoupage. Finished off by placing a Christmas tag in the top corner.
Thank you for visiting my blog please feel free to leave your comments.

Tuesday, 2 December 2014

Celebrate

Good Morning,
My post for today is this card using Tattered Lace dies once more......
For a change l chose to use a A5 portrait card, white, and the main matt is silver mirror card, the blue is from Hunkydory and l embossed using a Scruffy little cat folder, Chic, l then punched the ribbon band using one of my Tonic punches and layered this onto more mirror card, also wrapping some white satin ribbon around before attaching to the card. The topper is a mixture of Tattered Lace dies, this was then finished off by adding the two silver Card Candy.
I do hope you have enjoyed visiting my blog, l look forward to reading your comments, Thank You.

Sunday, 30 November 2014

Black & White Humming Bird

Hi there, here's my card for today.....
This is again a 6 x 6 square white card for the base card, think that this is my favourite at the mo....
l then found from my stash some lovely black glitter card and used this for the main matt, then next layer was white, then another layer of stain black card. The main image is a Tattered Lace die of the Humming Bird, this is a beautiful die and as all Tattered Lace pops out so easily. I didn't think that this card needed anything else and could be used for any occasion, don't you think!
Thanks for stopping by please leave any comments you have.

Friday, 28 November 2014

Bah humbug

Good morning there everyone.....
My card for today is one of my samples for my friends blog challenge, My craft creations please take a look at the prize and have a go....
For this card l started with a 6 x 6 white square card, for the main matt l chose some red mirror card, the next layer is backing paper to match. The topper is a digi-stamp and was coloured using my Chameleon pens, this was then cut and layered using my dies. This was then placed in the lower right hand corner once l had wrapped the Christmas ribbon around.
Hope you have enjoyed visiting my blog, please leave your comments, thank you.

Monday, 24 November 2014

Pink Roses

Hi there,
Here's my post for today.......
I made this card for my grandson's girlfriend, Bethan, for her birthday.
The base card is a 8 x 8 white card and the main background is left from one of Hunkydorys kits, l then used one of Crafters Companion make a card dies, inking the edges whilst still in the die with Spun Sugar distressed ink, l then off set the cut out oval and placed a silver happy birthday peel-off.
To complete this card l attached the three roses in the lower left corner with a couple of silver swirls.
I made a box for this card as the flowers are so deep.
Thank you for visiting my blog and look forward to seeing your comments.

Saturday, 22 November 2014

Purple Winter Wishes

Hi,
Here's my post for today, another Christmas one.....
For this one l chose to use a A5 portrait card, white again, l do use a lot of white card....
The Christmas Rose die was a freebie on the Tattered Lace magazine, as was the Winter Wishes off another one. The background was some purple card from my stash, and l embossed with my dotty folder. I glittered the edges of the Rose spray, and finished off the card by using, yet another Tattered Lace freebie.
Thanks for stopping by my blog, hope you enjoyed your visit, please leave my your comments.

Thursday, 20 November 2014

Christmas Lantern

Hello everyone,
hope you are all creating your Christmas cards its getting really close now....
For my post today this card is a A5 portrait white base card, and the main matt is from some green glitter card, l then stamped the border image and the topper and used my Chameleon pens. Then l chose a border punch for the right hand edge. The topper was then cut and matted onto some red mirror card and placed over the strip of glitter card, l decoupaged the poinsettia and leaves to give some dimension. Finished off with the message plaque.
I do hope you have enjoyed visiting my blog and look forward to your comments, Thank You.

Tuesday, 18 November 2014

Friends

Hi there,
The card l have chosen for today is a friendship one, thought l needed a change from all the Christmas projects.
The main card is a A5 landscape white base card and the main background is a piece of paper that l found within my stash, and is a lovely shade of blue. I then wrapped two different widths and shades of blue ribbon around the lower half of the card. The flowers l made using different shades of blue again and used the freebie dies from off the recent Tattered Lace magazine, and l chose to make the carnation ones, quite real to life don't you think? finished off this card using one of the Tonic sentiment toppers, which l inked the edges for definition.
I do hope you have enjoyed visiting my blog and feel free to leave your comments, Thank You.

Sunday, 16 November 2014

Christmas Rose

Good Morning.......
My post for today is this card l made using my Tattered Lace freebie that came with the magazine.
For the card l chose to use a 6 x 6 white card and used some silver mirror card for the main matt. I then layered a piece of pale blue paper that had a snowy effect on it. The dies l cut from some pearlescent card and l then coloured a small amount, the berries, and the centre of the roses, which l had by the way cut two extra ones out. I added three red gems within the corner holly, and finished off by cutting out the Christmas sentiment and adding this.
Thank you for visiting my blog please leave me your comments.

Friday, 14 November 2014

Boxed Candles

Hi there,
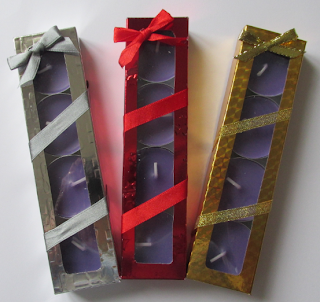
my post for today is another idea for stocking fillers....
The template was sent to me by my buddy, Sheila, and it is very simple to make and just holds 4 tea light candles. I made the boxes using mirror card to give a real christmasy feel. I thought then that they needed a little extra so l wrapped some narrow toning ribbon around and then added the bow on  top. These will be another item for my stock at my craft stall in December.
Thank you for stopping by and l do hope you will leave your comments.

Wednesday, 12 November 2014

Lge White and Red Wreath

Hi everyone,
Here's my post for today......
This wreath is a large one and l chose to make it more white than red, just for a change.
The Poinsettias were cut using my Spellbinders die and l used white pearlescent card, and glittered the edges of the petals. Used my glue gun for the centres and sprinkled tiny beads on whilst warm.
I then made the box to put it in, as seen below.
Thank you for stopping by and l do hope you have enjoyed visiting my blog, comments are welcome.

Saturday, 8 November 2014

Floral Canvas

Hi folks,
For todays post l have chosen one of my projects that l made a short while ago, l do hope l haven't duplicated it from previous posts.....
The canvas itself is 6 x 6 in size, and l inked and stamped it with distressed inks, and then also inked the edges to give definition. The flowers were made by using a Sue Wilson stamp, one of my favourites, and l chose three different papers, added some pearls sprays behind to finish the arrangement. I stamped the sentiment in the same colour and used one of my many dies to cut out the shape, attached to top right hand corner and added the two butterflies to complete it, also the ribbon for it to be hung if required.
Hope you have enjoyed visiting my blog and l look forward to reading your comments...Thank You.

Thursday, 6 November 2014

Owl inTree

Hi,
Here's my post for today.......
For this one l put a different slant on one of the designs from a Hunkydory kit...they are originally meant to be a free standing tree, but l found that they were top heavy and kept falling over so l decided to made an actual card. The base card is a A5 portrait card and l used a light beige in colour to pick out the lighter shade of the tree. I then wrapped a piece of acetate over the front and attached one of the trees, and then cut out the oval for the owl to show through. I then attached the other part of the tree within onto the actual card itself, and also the owl decoupage so when closed it looks as if you can see the owl "sitting" inside. Finished off attaching the text tag.
Thank you for stopping by my blog and l look forward to reading your comments.

Sunday, 2 November 2014

Desk Calendar

Here's my post for today,
This was included within a kit l recently bought from Hunkydory, and as usual this kit was beautifully foiled and die cut, and was very easy to make. this calendar is not dated, so would look lovely on any one's desk. There are tags within a pocket on the back, one for each month, and the smaller pocket on the front for the current month. Boxes are numbered to be able to turn appropriately for each day.
Hope you like this, and please feel free to leave your comments.....thank you.

Friday, 31 October 2014

Wintery Lane

Hi,
My post for today.......
As you are probably just like my seem to have stash that we never seem to get to, but hey this is a card l have made from some of mine, this card is made from a lingering kit, made by using a 6 x 6 white card, main matt is some silver mirror, then some textured white card. I then placed two strips of silver glitter card and then place the topper over. Finished off using a tag, bow and a few snowflakes, nice quick and easy card,
Thanks for stopping by and l do hope you find the time to leave your comments.

Thursday, 30 October 2014

Hooded Jacket

These are knitted with best baby double knitting wool, and can be ordered in colour required.
Usually got stock of the main colours....white, pink, blue, and cream, and are priced at £8.99 each
Interested?.....contact me  kathleen.freeman2@talktalk.net 

Wednesday, 29 October 2014

Framed Decoupage

Hi there, here's my post of today.....
This was a nice change to make as l had found some Tonic die cut box frames, and also came across the decoupage picture in my stash, so this is the finished item.
I made up the frame and covered the edges with some Hunkydory adorable scorable after first embossing it with my dotty folder. The decoupage was then inserted into the centre of the box, and then finished off with some more flowers in the corners of the box.....below are two pictures showing that l made a box for the finished project, thus making it an ideal gift.
Hope you have enjoyed stopping by my blog and look forward to reading your comments...Thank You.

Monday, 27 October 2014

My New Chameleon pens

Hi folks,
this is just a quickie really, l have just bought the new Chameleon pens and thought l would show you my first pictures l have coloured using them. They are bril. and l love using them, l will of course be posting finished items on my blog once l have made them......Thank you.....

Saturday, 25 October 2014

Art Deco Desk Calendar

Hi there everyone,  here's my post for today......
This was made using a blank kit from Craftwork cards,
For the design l chose to use some Art Deco leftovers to decorate, and used different colours for each tag. Each tag is decorated with the paper for background and then a topper added and also each month is put on each tag separately. I then added two coloured pieces of ribbon through the top of the tag, these are then each month tucked into the pocket on the front of the main box.
I loved doing this and will be making more, and it doesn't need to be said l have made myself a template.
Many thanks for stopping by and please leave me your comments.

Thursday, 23 October 2014

Little Claire, Oct./14

Here's my post for today.....
This was the Little Claire's October project and is quite different, as it has the little pockets inside.
The main design was by using 4 x 4 envelopes, three in total and they were stuck together with their flaps. They were then decorated in the way shown, toppers were edged with some silver glitter glue.
Pictures below show the inside, as it folds into three, being tied then with the ribbon.
Hope you have enjoyed popping in to view my blog, please feel free to leave your comments....
Thank You.

Tuesday, 21 October 2014

Iris's Birthday

Hi there everyone,
here's my post for today.....
I made this card for my friends birthday, yesterday, as she loves her perfumes l thought it quite appropriate.
The base card is a A5 landscape white card and l used some pearl card for the background, the topper is l believe one of Hunkydory's and l used one of my dies to cut it out. I then chose the dark maroon pearl card and matted the topper onto it, l also cut out the embellishments using the same card.
Her name was cut out using my Cricut machine.
She was thrilled to bits with it when l took it to her yesterday.
Thank you for stopping by my blog and please leave me your comments.

Sunday, 19 October 2014

Twin girls

Good morning,
here's my post for today.......
As l was making the previous commissioned card and cot, l thought hey l haven't got within my stock any cards for twin girls, so this is what l ending up making plus many more in both girls and boys.....
For a change l chose this a 6 x 6 white card blank and found both of the pink card stock in my stash one is glitter the other is pearlescent.  I used half and half and punched a border on the edge of the glitter one. The topper was once again using the Lily of the Valley stamp, and coloured with my Chameleon pens. Finished off adding congratulations tag and adding the pink gems.
Thank you for stopping by my blog, look forward to reading your comments.

Friday, 17 October 2014

Celebrate Twins

Good morning....
My post for today is a cot for birth of twin boys, and was a special order...
As you can see the cot was made very similar to my usual ones, but l put their names on the head and foot boards, and also added another teddy of course.....Below is the card also commissioned by the same person, also personalised with their names. For the card l chose to make a A5 landscape and of course followed through with the same colours. The stamp l used is a Lily of the Valley stamp and was coloured using my NEW Chameleon pens (they are Great) l then used one of my Spellbinder dies for the silver matts. Wrapped ribbon around before adding the finished matt and added the bow with the Baby charm added to it. Finished off by adding the "Twins are twice as nice" text tag.
Thank you for stopping by to visit my blog and hope you will add your comments. 

Wednesday, 15 October 2014

Decorated Candles

Hi ....here's my post for today.....
Now this is a nice change from card making and l have enjoyed it very much
The candles l purchased from one of my local shops, and have a Vanilla fragrance...
Finding in my stash l had some lovely patterned serviettes, so these were what l used.
l trimmed out the part of the design that l wanted and then held tightly around the candle
holding in place with some baking paper. Then using my head gun l made contact with the
heat and moved over the design, smoothing out any creases as l went along. For some of
them l trimmed with some of my border peel-offs, then placed in a cello-bag and tied
tightly at the top and added some ribbon for trim. Using a punch l punched out either flower
or butterfly for embellishment. I also made some Christmas ones as pictured below.
I do hope you have enjoyed visiting my blog and l look forward to reading your comments...
Thank You.

Monday, 13 October 2014

Robins

Good morning there everyone, ....my post for today is one l made from one of Hunkydory kits.
I thought that this would be a nice change from the wreath posted on Saturday.
The base card is a 6 x 6 white square card and l completely covered it with some gold mirror, then used a piece of the background also included in the kit. Then l added the two toppers also matted onto the same gold mirror, by adding the small tag this card was completed.
Quick and simple but hope you agree effective.
Thank you for visiting my blog and please leave me your comments, much appreciated.

Saturday, 11 October 2014

Small boxed wreath

Hi there hope everyone is o.k.
its a very murky foggy morning here in Burton on Trent, but excellent weather for some crafting....
My post for today is a wreath that l made using a Spellbinders die, its a bit time consuming to do all the cutting but well worth it. The base circle was painted with some green acrylic paint and then the ribbon was attached. Then all the worth of gluing the flowers on. The centres were made using my glue gun and some glitter glue sticks. To give a little lift l made the three white Poinsettias.
Below is the completed wreath within the box that l made for it. I have already sold one of these, so hopefully my charity will benefit from the work put into them.
Hope you have enjoyed stopping by my blog and l look forward to reading your comments.
Thank You.

Thursday, 9 October 2014

Linda's birthday

Good morning everyone, here's my post for today.........
I made this for one of my friends that meet up for demonstration days at our local garden centre....
The base card was layered with a white background that had been embossed, then, using one of my new Tonic dies l made the header, so to speak, using both the same white and some pearl bronze colour, added the chosen centre piece, special friend,  l then added the three paper flowers in the left corner, and finished off with the bow with the pearl stud in the centre. As there is quite a bit of dimension l made a box in the same bronze pearl card.
I do hope you have enjoyed visiting my blog, look forward to your comments, thank you.

Tuesday, 7 October 2014

Seems like Yesterday

Hi everyone,
Hey, my post for today is not from a kit, hope you like it....
this is one of my samples that l made for a challenge blog mycraftcreations , do take a look and take part there's lovely prizes.
The main image is a digi-stamp, and l coloured it with my Spectrum Noir pencils, l am using them quite frequently nowadays. For the background l chose to use one of the Messy Rabbit backing papers l thought is quite appropriate at the little ones were looking through a book, this was all then layered onto a 6 x 6 white card, ideal for any occasion don't you think?
Thanks for stopping by and l will look forward to reading your comments.

Sunday, 5 October 2014

Diarama cards

Hi,
My post for today is yet another one from the Hunkydory kit, at moment just need simple things to make, my poor brain is a little tired from the preparation for my grand-daughters wedding, l will get back to my normal crafting soon l promise,
These were again quite simple to make and l think very effective once finished. They are very similar to decoupage really, just with the concertina folds on the sides to make them 3D. When finished they fold flat to go into the envelope and therefore keeping postage to a minimum.
Hope you have enjoyed visiting my blog, please feel free to leave your comments, Thank You.

Friday, 3 October 2014

Calendar

Hi there.....
Gosh another week over, where do the days go....
my post for today is a Hunkydory project that was included within one of their kits, as l have said before sometimes its nice to make something from a kit, gives the old brain a rest so to speak  haha.
This was quite easy to make and consists of a stand and the three boxes that once made up they rotate to be able to change the date. There is also a pocket to hold the spare months on the back, so is kept self-contained. Not a lot more to say really about this completed gift.
Thank you for visiting my blog and hope you will leave your comments.

Wednesday, 1 October 2014

Kingfisher

Hello everyone,
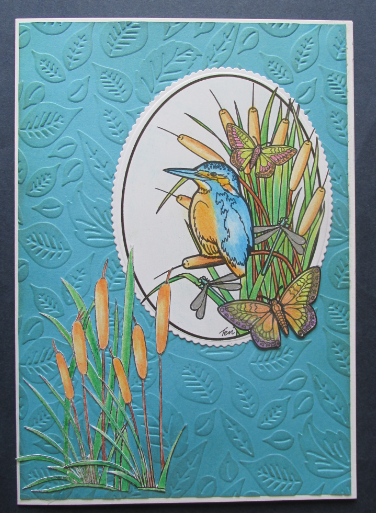
back to card-making now and this one l made for my friends blog challenge, please take a look and perhaps join inmycraftcreations
The main card is an A5 portrait white card and for the background l chose the pretty blue to tone with the Kingfisher, embossed it using the leaves folder. The main topper is a digi-stamp and l coloured it using my Spectrum pencils, really getting into using those now......then using one of my many dies l cut it out and placed it slightly off centre. I decided l wanted more bull-rushes, so searching through my stamps l found these that were from a set from Dimensions, stamped a few times and layered them in the bottom left corner....as always l have left the rest an open space to be able to personalise for any occasion.
Thank you for stopping by, please leave your comments.

Monday, 29 September 2014

Confectionery Cart

Hi
Here's a project l recently did for my grand-daughters Wedding.....this is the very first time l have worked on this kind of thing.
The cart itself came just plain white as photo below......
it was quite daunting at first, but l started by making the canopy using some purple organza off the roll, machining it onto some tape, gathering as l was sewing, thank goodness for my machine.... l then attached onto the top section using my staple gun, this was a boon for this job. I bought some cheap fairy lights and draped those in a scallop, also a Mr. and Mrs. bunting. For the rest l continued with the different ribbons and bows draping around the up-rights and the wheels. Topping it all off with some pull-bows attached both on the wheels as well as the rest of the cart. My grand-daughter and new hubby were chuffed to bits with it, as did many guests as they visited for their sweeties.
Thank you for visiting my blog, will look forward to your comments.

Saturday, 27 September 2014

Leanne & Todd's Wedding

Hi there,
My post for today is the card l made for my grand-daughters wedding, yesterday.....
As her colour was Cadbury Chocolate purple l kept this for the backing for the heart, this is one of my Spellbinder dies. The card itself is a 6x6 white linen card, matted onto the same purple, then the top matt was embossed with the corner design. The text is Tattered Lace dies, and then l completed it with the gems. Inside l made a pocket on the lost leaf as they had requested Thomas Cook travel vouchers for presents, which l thought quite sensible as they have already got their home up and running.
Many thanks for stopping by, please leave your comments l do enjoy reading them.

Thursday, 25 September 2014

Tilly Daydream

Hello everyone
As Autumn seems to be on its way l thought that this card is quite appropriate...
This is a complete change for me as regarding the size etc. l have chosen a white scalloped DL card,
l then chose the two backgrounds, one with leaves on and the other a lovely light beige pearl card and ran this one through my Ebosser with the leaves folder to compliment it. The topper is a lovely decoupage of Tilly Daydream kicking up the autumn leaves, finished off by tucking some die-cut leaves underneath. I left the space at the side as l quiet often get asked at my stall for either age or name on, l have learnt now to leave space for this.
Thank you for stopping by and please feel free to leave your comments.

Tuesday, 23 September 2014

Baby's cot

Hi there, my blog for today is a little different once again....
As you all probably know by now l have a regular booking at my local hospital for a stall selling my cards and gifts to raise funds for local charities so l won't go on about.
These have been very popular, and have made them both in pink and blue, and am going to try a neutral one too this time.
My very good friend Sheila cuts these out for me using her Robo, then sends them to me for me to decorate and make up to my own requirements. The photo is really self explanatory, and l buy the tiny teddies so as to place one in the corner, adding a small tag for sentiments to be written on.
I do hope you have enjoyed visiting my blog, please feel free to leave your comments they would be very welcome.

Sunday, 21 September 2014

Thank You heart

Hello everyone, here's my post for today......
My friends Mum was very good and knew that l had been looking for hearts to decorate and sell at my Hospital craft stall, and she found these and bought some for me, l offered to refund her the money spent but she wouldn't hear of it and asked for one when l made it up, so this is the one l made for her......
As the base heart is brown MDF product, l first painted with some white acrylic paint, l then inked and embossed some flourishes with some glitter embossing powder. Once dry l inked the inner and outer edges with Faded Jeans distressed ink, then fastened some ribbon across the centre. The flowers were a selection that l made from both using dies and paper clay, as is the Butterfly, and of course a little of glitter found its way there too. Attached the ribbon for hanging purposes, and the gift is finishes. I have heard since that she was over the moon with it, and is now hanging up in her craftroom.
Many thanks for stopping by my blog, love to hear your comments.

Friday, 19 September 2014

Mum's Birthday

For todays post l have chosen the card l made for my Mum, she was 92 years young, and still loves to make her cards, which she donates to the local Hospice.
The dies l used were from Tonic, and l decided to make a A5 gate fold card in the lovely shade of purple pearlescent card. I attached a separate butterfly on the girls hand, and the corners l used were Spellbinders. Below is the inside, and l placed a verse on the back of the card for me to sign for her.
I do hope you have enjoyed visiting my blog, please leave your comments, Thank You.